This is an old revision of the document!

(remove this paragraph once the translation is finished)
Set up E-mail templates
What are e-mail templates?
With e-mail templates you can put your own text or logo in front of and / or behind the actual content of the e-mail. The template can also use CSS to change the layout of the e-mail, such as font size, font color or background color. You can also deposite pictures of your website e.g. the club logo. Also other texts of the web page or to the association can be written within the template. If the user creates an e-mail, the content of the template for this e-mail will be added before sending this e-mail. The recipient of the e-mail then sees the merged result from the created text of the user, as well as the additions from the template.
How do I create e-mail templates?
Starting with Admidio Version 3, e-mail templates can be used. These are stored in the folder adm_my_files/mail_templates. If this folder does not exist, then you should create it.
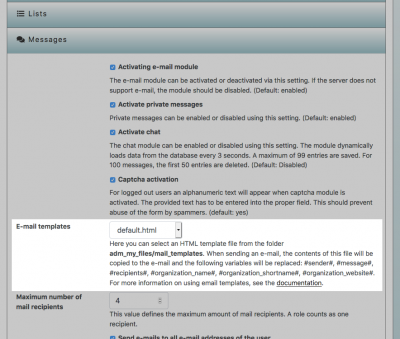
The e-mail template is defined via an HTML file. In Admidio Version 3, only one file named template.html can be used. From Admidio Version 4 you can create several templates and choose the name freely. It always has to be a file with the extension .html. Even if you do not want to use HTML emails, you need to create an HTML file, but then just add text there. From Admidio Version 4 you can now select in the settings of messages at e-mail template the file you just created.
Within the html-file you can add further content with predefined parameters. Mandatory is the parameter #message#, which adds the actual content of the e-mail. You can then place this parameter in your template as you like.
Example of an e-mail template:
<html>
<head>
<style type="text/css">
   body {background: #96C4cb; color: #ffffff;}
</style>
</head>
<body>
This is a sample text that precedes the actual content of the e-mail.
<i>Now follows the actual content:</i>
#message#

At the end of the e-mail is this text.
</body>
</html>
How do I implement parameters in the template?
Within the html template you can use different parameters, which will then be replaced by the corresponding content when sending the e-mail. Put the parameters anywhere in your template.
Example of a template with different parameters:
<html>
<body>#sender# sent to #recipients# from #organization_website# this message:
<hr />
#message#
</body>
</html>
The following parameters are available:
| Parameter | Mindestversion | Beschreibung |
|---|---|---|
| #message# | 3.0 | Der Inhalt der E-Mail. Dieser Parameter muss in jeder Vorlage hinterlegt werden! |
| #sender# | 3.0 | Bitte nur in Version 3.x nutzen. Vorname und Nachname des Absenders |
| #sender_name# | 4.0 | Vorname und Nachname des Absenders |
| #sender_email# | 4.0 | E-Mail Adresse des Absenders |
| #receiver# | 3.0 | Bitte nur in Version 3.x nutzen. Empfänger der E-Mail. Rollen und einzelne Benutzer. |
| #recipients# | 4.0 | Empfänger der E-Mail. Rollen und einzelne Benutzer (bei BCC-Versand nur die Anzahl der einzelnen Benutzer) Beispiel: Mitglieder, Vorstand und 3 einzelne Benutzer. |
| #organization_name# | 4.0 | Name der Organisation. |
| #organization_shortname# | 4.0 | Abkürzung der Organisation. |
| #organization_website# | 4.0 | Webseite der Organisation. |
Wie nutze ich Vorlagen bei mehreren Organisationen?
Habt ihr in Admidio mehrere Organisationen hinterlegt und wollt nun in der E-Mail-Vorlage Bezug auf die jeweilige Organisation nehmen unter der der Anwender die E-Mail erstellt hat, so habt ihr ab Admidio Version 4 zwei unterschiedliche Möglichkeiten.
Möchtet ihr nur den Namen oder die Webseite der Organisation in der Vorlage hinterlegen, so könnt ihr die Parameter #organization_name#, #organization_shortname# oder #organization_website# nutzen. Baut diese an einer beliebigen Stelle in der Vorlage ein. Sobald die E-Mail dann erstellt wird, werden diese durch die jeweilige Organisationsdaten ersetzt.
Möchtet ihr neben dem Namen vielleicht auch ein Logo, einen Schriftzug oder ein Farbschema der jeweiligen Organisation in der Vorlage hinterlegen, so müsst ihr separate HTML-Vorlagen erstellen. Dort könnt ihr dann jeweils über CSS oder dem einbinden von Bildern die Vorlage an eure Vorstellung anpassen und unter einem eigenen Namen z.B. vorlage-organisation-1.html im Ordner adm_my_files/mail_templates abspeichern. Geht nun in die Einstellungen der jeweiligen Organisation und wählt dort unter den Einstellungen der Nachrichten bei E-Mail-Vorlage nun die jeweilige Vorlage der Organisation aus.

